Friday, December 19, 2014

Featured Plant of The Day: 'Moon Bay' Heavenly Bamboo

Nandina domestica 'Moon Bay'
    Heavenly Bamboo

Type    Shrub, woody plant
Hardy range    6B to 10A
Height    12" to 24" / 30cm to 60cm
Spread    12" to 24" / 30cm to 60cm
Growth rate    Slow
Form    Rounded
Exposure    Partial shade or partial sun to full sun
Persistence    Evergreen

Bloom Color    White
Bloom Time    Spring

The flowers are showy.

Environment
This plant tolerates some drought and some salt.
This plant will grow in dry soil.
Suitable soil is well-drained/loamy, sandy or clay.
The pH preference is an acidic to alkaline (less than 6.8 to more than 7.7) soil.

Leaf Color    Green and purple
Fall Color    Red
This plant has attractive foliage and attractive fall colors.
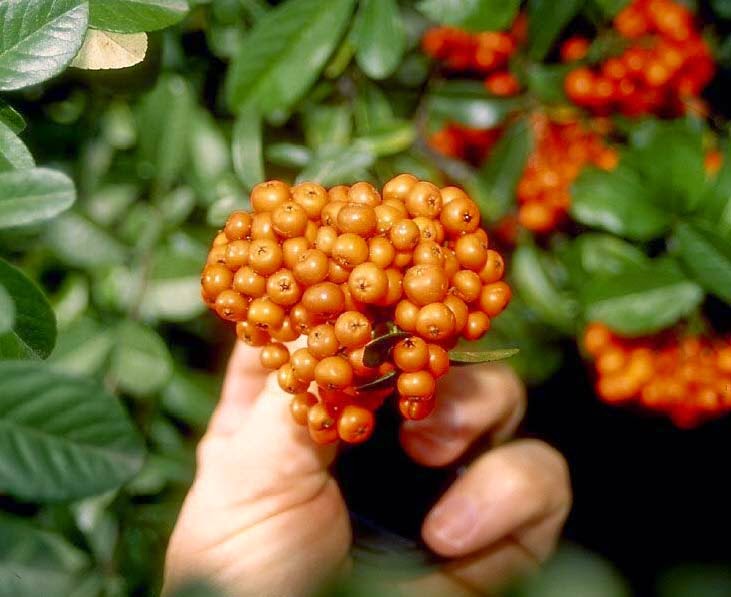
Fruit Color    Red

This plant rarely fruits.
The fruit is fleshy and round.

Native Habitat
Species native from India to eastern Asia.

Fruit Color    Red

This plant rarely fruits.
The fruit is fleshy and round.

Landscape Uses
-    Container plantings
-    Border
-    Foundation planting
-    Massing
-    Groundcover

Attributes and Features
-    Inconspicuous fruit
-    Fruit is edible by birds

Culture Notes
Nandina in partial shade but will exhibit richer-colored red fall foliage if planted in the sun.  Foliage diseases will be less in full sun.  Although tolerant of drought once established, rich soil and ample moisture will produce a lusher, better-looking plant.  Plants survive with neglect, although regular fertilization encourages growth and thicker plants.  With bamboo-like stalks and delicate, fern-like foliage, Nandina is much-prized for its oriental effect and distinctive appearance. This cultivar maintains red foliage in winter and may be one of the best compact selections.

Nandina is a low maintenance shrub, requiring only one pruning each year to control plant height, if needed.  The tallest canes should be trimmed to the ground or to different heights to encourage growth and to reduce the size.  This will provide for more foliage toward the ground and promote a denser plant.  Recent selections have produced several dwarf cultivars, and although most of these do not flower and fruit, they do produce vividly-colored fall foliage and can be used as a ground cover.

Planting and establishing shrubs

The most common cause of young plant failure is planting too deep.  Plant the root ball no deeper than it was in the nursery.  In most instances, the root flare zone (point where the top-most root in the root ball originates from the trunk) should be located just above the landscape soil surface. Sometimes plants come from the nursery with soil over the root flare. If there is soil over this area, scrape it off.  The planting hole should be at least twice the width of the root ball, preferably wider.  In all but exceptional circumstances where the soil is very poor, there is no need to incorporate anything into the backfill soil except the loosened soil that came out of the planting hole.  Never place ANY soil over the root ball. If a row or grouping of plants is to be installed, excavating or loosening the soil in the entire bed and incorporating organic matter enhances root growth and establishment rate.

Weed suppression during establishment is essential.  Apply a 3-inch thick layer of mulch around the plant to help control weed growth.  Keep it at least 10 inches from the trunk.  If you apply it over the root ball, apply only a one or two inch layer.   This allows rainwater and air to easily enter the root ball and keeps the trunk dry.  Placing mulch against the trunk or applying too thick a layer above the root ball can kill the plant by oxygen starvation, death of bark, stem and root diseases, prevention of hardening off for winter, vole and other rodent damage to the trunk, keeping soil too wet, or repelling water.  Regular irrigation through the first growing season after planting encourages rapid root growth, which is essential for quick plant establishment.

Thursday, December 18, 2014

Featured Plant of The Day: Grecian Windflower


Anemone blanda
    Grecian Windflower,  Greek Anemone,  Windflower

Type    Perennial
Hardy range    6A to 10A
Height    4" to 6" / 10cm to 15cm
Growth rate    Average
Form    Spreading or horizontal
Exposure    Partial shade or partial sun to full sun
Persistence    Deciduous

Bloom Color    Blue, pink and white
Bloom Time    Spring and Winter

The flowers are suitable for cut flowers.

Environment
This plant will grow in moist soil.
Suitable soil is well-drained/loamy or sandy.
The pH preference is  a neutral soil.

Leaf Color    Green
This plant has attractive foliage.

Landscape Uses
-    Container plantings
-    Alpine garden
-    Rock garden
-    Border
-    Massing
-    Groundcover

Attributes and Features
-    Naturalizing
-    Attracts butterflies

Culture Notes
Leave anemones undisturbed after planting.  Do not let the soil get too wet, or rotting may occur.  The flowers of the anemone close at night and during cloudy weather.  Division can be made to the tuber in fall or early spring.  This plant does self seed easily and form large colonies.


Tuesday, December 16, 2014

Featured Plant of The Day: Fraser Fir


Abies fraseri
    Fraser Fir,  Southern Balsam Fir

Type    Tree, woody plant
Hardy range    4A to 7A
Height    30' to 50' / 9.20m to 15.20m
Spread    15' to 20' / 4.60m to 6.00m
Growth rate    Slow
Form    Pyramidal
Exposure    Partial shade or partial sun to full sun
Persistence    Evergreen

Bloom Color    Red
Bloom Time    Spring

EnvironmentThis plant tolerates occasional wetness and salt well.
This plant will grow in occasionally wet soil.
Suitable soil is well-drained/loamy, sandy or clay.
The pH preference is an acidic to neutral (less than 6.8 to 7.2) soil.

 Leaf Color    Green
Fall Color    No change in fall color

 Native Habitat
Only fir endemic to the southern Appalachian Mountains in eastern North America. Native habitat receives 75 to 100 inches of annual precipitation on upper slopes. Average summer temperatures rarely exceed 60 degrees F and fog is a common occurrence. Soils are often rocky and thin with a pH 3.5 to 4.2. Found mostly above 5500 feet but can grow down to 4500 on northern slopes.

 Landscape Uses
-    Screen
-    Specimen

 Attributes and Features
-    Christmas tree
-    Inconspicuous blooms
-    Inconspicuous fruit
-    Fruit attracts animals

Culture Notes
Best for moist to wet soils in the mountains near its native habitat, but adapts to dry sites as well. Firs like an organic soil or organic matter incorporated into the potential root zone. Makes one of the nicest Christmas trees and is very popular.  Annual fertilization in the Christmas tree farm has been found to increase the retail value by 20%.

This is a tree best saved for planting in the mountains and not brought to the landscapes on the piedmont and coastal planes. Roots of firs are usually shallow and grow straight out from the trunk. Needles are less fragrant than A. balsamea. Red squirrels love the terminal buds and seeds.  This plant is considered mostly allergy free and causes little or no allergy problems in most people.

Maintain adequate mulch area

Be sure to clear all turf away from beneath the branches and mulch to the drip line (the edge of the branches), especially on young trees, to reduce competition with turf and weeds.  This will allow roots to become well established and keep plants healthier.  Locate the tree properly, taking into account the ultimate size, since the tree looks best if it is not pruned to control size.  The tree can enhance any landscape with its delightful spring flush of foliage.  It can be the centerpiece of your landscape if properly located.

Tree establishment specifications

Choose good quality trees for planting. The most common cause of young tree failure is planting too deep.  In most instances, the point where the top-most root in the root ball originates from the trunk (referred to as the root flare zone or root collar) should be located just above the soil surface.  You may have to dig into the root ball to find the root flare. If there is nursery soil over this area, scrape it off. Never place ANY soil over the root ball. The planting hole should be at least twice the width of the root ball, preferably wider because roots grow best in loose soil.  In all but exceptional circumstances where the soil is very poor, extensive research clearly shows that there is no need to incorporate any amendments into the backfill soil. Simply use the loosened soil that came out of the planting hole. Simply planting with the topmost portion of the root ball slightly higher than the surrounding soil might still install the tree too deep - be sure to locate the root flare.

Weed suppression during establishment is essential.  Apply a 3-inch thick layer of mulch to at least a six-foot diameter circle around the tree. This area should be at least two feet in diameter for each inch of tree trunk diameter and maintained during the establishment period.  Apply a thinner layer of mulch directly over the root ball but keep it at least 10 inches from the trunk. This allows rainwater, irrigation and air to easily enter the root ball and keeps the trunk dry.  Placing mulch against the trunk and applying too thick a layer above the root ball can kill the plant by oxygen starvation, death of bark, stem and root diseases, prevention of hardening off for winter, vole and other rodent damage to the trunk, keeping soil too wet, or repelling water.

Regular irrigation after planting encourages rapid root growth that is essential for tree establishment.  Trees provided with regular irrigation through the first growing season after transplanting require about 3 months (hardiness zones 9-11), 6 months (hardiness zones 7-8), or one year or more (hardiness zones 2-6) per inch of trunk diameter to fully establish roots in the landscape soil. Trees in desert climates may take longer to establish.  Trees that are under-irrigated during this establishment period (and most trees are) often require additional time to establish because roots grow more slowly.   Be prepared to irrigate through the entire establishment period, especially during periods of drought.

Irrigation also helps maintain and encourage the desirable dominant leader in the tree canopy on large-maturing trees.  Instead of a dominant leader, trees that are under-irrigated during the establishment period often develop undesirable, low, co-dominant stems and double leaders that can split from the tree later.

Unlike established plants, which do best with deep, infrequent irrigation, research clearly shows that recently transplanted trees and shrubs establish quickest with light, frequent irrigation.  For trees planted in spring or summer, provide one (cooler hardiness zones) to three irrigations (warmer hardiness zones) each week during the first few months after planting.  Daily irrigation in the warmest hardiness zones provides the quickest establishment.  Following the initial few months of frequent irrigation, provide weekly irrigation until plants are fully established.  With every irrigation, apply one (cool climates) to two (warm climates) gallons of water per inch trunk diameter (e.g. 2 to 4 gallons for a 2-inch tree) over the root ball only.  In most landscapes that receive more than 30 inches of rain or irrigation annually, if the mulch area is maintained weed-free, irrigation does not need to be applied outside of the root ball.  Never add water if the root ball is saturated.

In cooler hardiness zones, in all but the driest years, irrigation of spring- and summer-planted trees usually can be discontinued once fall color has begun. Irrigation of fall planted trees, however, should be continued until foliage has dropped from the deciduous trees in the region.  In warmer climates, irrigate fall-and winter-planted trees as described for the spring- and summer-planted trees.

In drier, desert climates there is benefit to be gained from applying additional irrigation outside of the root ball area. This is best done by making a large diameter berm four to six inches high, then filling it with water so it percolates into the soil.  For the first two years, irrigate twice each week through the spring, once per week in summer provided monsoons arrive, and twice each week again in fall if it remains warm.  Taper off watering to once or twice each month in winter and resume twice weekly next spring.  For years three to five, water twice per month in spring, summer, and fall and once or twice per month in winter.  During years five through seven, water once every three weeks in warm weather and once every six weeks in winter.  After this, the drought-tolerant desert trees should be able to survive on natural rainfall.

Trees with good, strong structure need no pruning at planting, except to remove broken twigs.  Do not remove branches to compensate for root loss - research has shown that this can be detrimental to establishment.

Thursday, December 4, 2014

Featured Plant of The Day: 'Pyramidalis' Eastern Red Cedar

Juniperus virginiana 'Pyramidalis'
    Eastern Red Cedar,  Silver Cedar,  Burk Eastern Red Cedar,  Silver Eastern Red Cedar

Type    Tree, woody plant
Hardy range    2B to 9A
Height    25' to 40' / 7.60m to 12.20m
Spread    12' to 20' / 3.60m to 6.00m
Growth rate    Fast
Form    Pyramidal and vase shaped
Exposure    Partial shade or partial sun to full sun
Persistence    Evergreen

Bloom Color    Green and yellow
Bloom Time    Spring

Environment
This plant tolerates drought and salt well.
This plant will grow in very dry soil.
Suitable soil is well-drained/loamy, sandy or clay.
The pH preference is an acidic to alkaline (less than 6.8 to more than 7.7) soil.

Leaf Color    Blue and green
Fall Color    No change in fall color
This plant has fragrant foliage.

Landscape Uses
-    Screen
-    Specimen

Attributes and Features
-    Attracts birds
-    Inconspicuous blooms
-    Persistent fruit
-    Attractive fruit
-    Fruit is edible by birds

This plant is best when trained to a dominant trunk.
This plant typically grows with one trunk.

Culture Notes
Planted in full sun or partial shade, Eastern Red Cedar will easily grow on a variety of soils, including clay, but will not do well on soils kept continually moist.  Growth may be poor in landscapes which are over-irrigated.  Plants are difficult to transplant due to a coarse root system, except when quite small.  Water until well-established and then forget about the tree.  It performs admirably with no care, even on alkaline soil and along the coast.  Usually insects and diseases are not a problem if grown in the full sun.

There may be local restrictions on planting this tree near apple orchards because it is the alternate host for cedar-apple rust. There is a broad group of plant forms within this cultivar name. Prune to one leader to help prevent the tree from splitting in ice storms.

Natural habitat is dry and windy with full sun exposure.  It looks best in an open site with no shade during the day.  This allows the foliage to dry quickly in the morning and helps prevent foliage disease from thinning the canopy.  A well-drained soil is essential for good growth.  Wet soil rots the roots and causes plant decline.

Plants serve as hosts for swedner's hairstreak (Mitoura gryneus swedneri) butterfly larvae.

Planting and establishing shrubs
The most common cause of young plant failure is planting too deep.  Plant the root ball no deeper than it was in the nursery.  In most instances, the root flare zone (point where the top-most root in the root ball originates from the trunk) should be located just above the landscape soil surface. Sometimes plants come from the nursery with soil over the root flare. If there is soil over this area, scrape it off.  The planting hole should be at least twice the width of the root ball, preferably wider.  In all but exceptional circumstances where the soil is very poor, there is no need to incorporate anything into the backfill soil except the loosened soil that came out of the planting hole.  Never place ANY soil over the root ball. If a row or grouping of plants is to be installed, excavating or loosening the soil in the entire bed and incorporating organic matter enhances root growth and establishment rate.

Weed suppression during establishment is essential.  Apply a 3-inch thick layer of mulch around the plant to help control weed growth.  Keep it at least 10 inches from the trunk.  If you apply it over the root ball, apply only a one or two inch layer.   This allows rainwater and air to easily enter the root ball and keeps the trunk dry.  Placing mulch against the trunk or applying too thick a layer above the root ball can kill the plant by oxygen starvation, death of bark, stem and root diseases, prevention of hardening off for winter, vole and other rodent damage to the trunk, keeping soil too wet, or repelling water.  Regular irrigation through the first growing season after planting encourages rapid root growth, which is essential for quick plant establishment.


Wednesday, December 3, 2014

Featured Plant of The Day: 'Mohave' Pyracantha

Pyracantha coccinea 'Mohave'
Firethorn,  Pyracantha

Type    Shrub, woody plant
Hardy range    6B to 10A
Height    6' to 10' / 1.80m to 3.00m
Spread    10' to 15' / 3.00m to 4.60m
Growth rate    Fast
Form    Upright or erect
Exposure    Partial shade or partial sun to full sun
Persistence    Evergreen

Bloom Color    White
Bloom Time    Spring

The flowers are showy.

Environment
This plant tolerates drought, occasional wetness and a little salt.
This plant will grow in very dry to occasionally wet soil.
Suitable soil is well-drained/loamy, sandy or clay.
The pH preference is an acidic to alkaline (less than 6.8 to more than 7.7) soil.

Leaf Color    Green
Fall Color    No change in fall color

Landscape Uses
-    Seashore planting
-    Arbor
-    Espalier
-    Massing
-    Erosion control

Attributes and Features
-    Attracts butterflies
-    Persistent fruit
-    Attractive fruit
-    Fruit is edible by birds

Culture Notes
Surviving best in full sun and well-drained soil, pyracantha is slightly salt-tolerant.  Flowers are borne on last year's wood, so prune after flowering in the spring to maximize flower display.  Left to grow naturally, Firethorn will develop into a small tree or large sprawling bush with dark green leaves and long arching branches, making it ideally suited to large-scale shrubbery borders.  While sometimes grown as an espalier against a wall, Firethorn's rampant growth makes this treatment labor-intensive.  With proper training, this plant can quickly shade a wall which will reduce energy bills.  Begin this training process early and pinch often to create a well-branched plant.  Several large stems often develop, and frequent pinching prevents them from dominating the plant.

This cultivar has a very heavy fruit set.  Plants serve as hosts for butterfly larvae.

Planting and establishing shrubs 
The most common cause of young plant failure is planting too deep.  Plant the root ball no deeper than it was in the nursery.  In most instances, the root flare zone (point where the top-most root in the root ball originates from the trunk) should be located just above the landscape soil surface. Sometimes plants come from the nursery with soil over the root flare. If there is soil over this area, scrape it off.  The planting hole should be at least twice the width of the root ball, preferably wider.  In all but exceptional circumstances where the soil is very poor, there is no need to incorporate anything into the backfill soil except the loosened soil that came out of the planting hole.  Never place ANY soil over the root ball. If a row or grouping of plants is to be installed, excavating or loosening the soil in the entire bed and incorporating organic matter enhances root growth and establishment rate.

Weed suppression during establishment is essential.  Apply a 3-inch thick layer of mulch around the plant to help control weed growth.  Keep it at least 10 inches from the trunk.  If you apply it over the root ball, apply only a one or two inch layer.   This allows rainwater and air to easily enter the root ball and keeps the trunk dry.  Placing mulch against the trunk or applying too thick a layer above the root ball can kill the plant by oxygen starvation, death of bark, stem and root diseases, prevention of hardening off for winter, vole and other rodent damage to the trunk, keeping soil too wet, or repelling water.  Regular irrigation through the first growing season after planting encourages rapid root growth, which is essential for quick plant establishment.

Pests, Diseases and Damaging Agents
Pests:  Aphids suck plant juices and coat the leaves with sticky honeydew.  Hawthorn lace bug discolors the foliage and leaves black flecks on the undersides of leaves.  Mites cause yellowish foliage, and heavy infestations form fine webbing.

Diseases: Resistant to fireblight and scab in many situations. Fire blight causes wilting and blackening of shoots.  Scab causes dark areas on the leaves that turn yellow, then brown, then drop off.  Rake up and destroy infected leaves.

Monday, December 1, 2014

Featured Plant of The Day: Atlantic White Cedar

Chamaecyparis thyoides 'Ericoides'
White Cypress,  Atlantic White Cedar,  Coast White Cedar,  Southern White Cedar

Type    Shrub, woody plant
Hardy range    4A to 9A
Height    10' to 15' / 3.00m to 4.60m
Spread    36" to 4' / 90cm to 1.20m
Growth rate    Average
Form    Columnar and oval
Exposure    Partial shade or partial sun to full sun
Persistence    Evergreen

 Bloom Time    Spring

 Environment
This plant tolerates some drought and occasional wetness.
This plant will grow in dry to occasionally wet soil.
Suitable soil is well-drained/loamy, sandy or clay.
The pH preference is an acidic to neutral (less than 6.8 to 7.2) soil.

Leaf Color    Blue
Fall Color    No change in fall color

Landscape Uses
-    Container plantings
-    Rock garden
-    Border
-    Screen
-    Specimen

Attributes and Features
-    Wetlands plant
-    Attracts birds
-    Inconspicuous blooms
-    Inconspicuous fruit

This plant can be trained to a single trunk.
Little pruning is required.


Culture Notes
White cedar should be grown in full sun in moist, well-drained soil but plants will gladly adapt to wet, boggy sites which are similar to their native habitat of fresh-water swamps or stream banks.  It is probably best used on sites which are similar to its native wetland habitat, although it adapts to a landscape nicely.  Pollen can cause significant allergenic reactions in certain people.
 
Tree establishment specifications

Choose good quality trees for planting. The most common cause of young tree failure is planting too deep.  In most instances, the point where the top-most root in the root ball originates from the trunk (referred to as the root flare zone or root collar) should be located just above the soil surface.  You may have to dig into the root ball to find the root flare. If there is nursery soil over this area, scrape it off. Never place ANY soil over the root ball. The planting hole should be at least twice the width of the root ball, preferably wider because roots grow best in loose soil.  In all but exceptional circumstances where the soil is very poor, extensive research clearly shows that there is no need to incorporate any amendments into the backfill soil. Simply use the loosened soil that came out of the planting hole. Simply planting with the topmost portion of the root ball slightly higher than the surrounding soil might still install the tree too deep - be sure to locate the root flare.

Weed suppression during establishment is essential.  Apply a 3-inch thick layer of mulch to at least a six-foot diameter circle around the tree. This area should be at least two feet in diameter for each inch of tree trunk diameter and maintained during the establishment period.  Apply a thinner layer of mulch directly over the root ball but keep it at least 10 inches from the trunk. This allows rainwater, irrigation and air to easily enter the root ball and keeps the trunk dry.  Placing mulch against the trunk and applying too thick a layer above the root ball can kill the plant by oxygen starvation, death of bark, stem and root diseases, prevention of hardening off for winter, vole and other rodent damage to the trunk, keeping soil too wet, or repelling water.

Regular irrigation after planting encourages rapid root growth that is essential for tree establishment.  Trees provided with regular irrigation through the first growing season after transplanting require about 3 months (hardiness zones 9-11), 6 months (hardiness zones 7-8), or one year or more (hardiness zones 2-6) per inch of trunk diameter to fully establish roots in the landscape soil. Trees in desert climates may take longer to establish.  Trees that are under-irrigated during this establishment period (and most trees are) often require additional time to establish because roots grow more slowly.   Be prepared to irrigate through the entire establishment period, especially during periods of drought.

Irrigation also helps maintain and encourage the desirable dominant leader in the tree canopy on large-maturing trees.  Instead of a dominant leader, trees that are under-irrigated during the establishment period often develop undesirable, low, co-dominant stems and double leaders that can split from the tree later.

Unlike established plants, which do best with deep, infrequent irrigation, research clearly shows that recently transplanted trees and shrubs establish quickest with light, frequent irrigation.  For trees planted in spring or summer, provide one (cooler hardiness zones) to three irrigations (warmer hardiness zones) each week during the first few months after planting.  Daily irrigation in the warmest hardiness zones provides the quickest establishment.  Following the initial few months of frequent irrigation, provide weekly irrigation until plants are fully established.  With every irrigation, apply one (cool climates) to two (warm climates) gallons of water per inch trunk diameter (e.g. 2 to 4 gallons for a 2-inch tree) over the root ball only.  In most landscapes that receive more than 30 inches of rain or irrigation annually, if the mulch area is maintained weed-free, irrigation does not need to be applied outside of the root ball.  Never add water if the root ball is saturated.

In cooler hardiness zones, in all but the driest years, irrigation of spring- and summer-planted trees usually can be discontinued once fall color has begun. Irrigation of fall planted trees, however, should be continued until foliage has dropped from the deciduous trees in the region.  In warmer climates, irrigate fall-and winter-planted trees as described for the spring- and summer-planted trees.

In drier, desert climates there is benefit to be gained from applying additional irrigation outside of the root ball area. This is best done by making a large diameter berm four to six inches high, then filling it with water so it percolates into the soil.  For the first two years, irrigate twice each week through the spring, once per week in summer provided monsoons arrive, and twice each week again in fall if it remains warm.  Taper off watering to once or twice each month in winter and resume twice weekly next spring.  For years three to five, water twice per month in spring, summer, and fall and once or twice per month in winter.  During years five through seven, water once every three weeks in warm weather and once every six weeks in winter.  After this, the drought-tolerant desert trees should be able to survive on natural rainfall.

Trees with good, strong structure need no pruning at planting, except to remove broken twigs.  Do not remove branches to compensate for root loss - research has shown that this can be detrimental to establishment.